Inverted shock absorbers are designed for racing and are mainly made of metal materials in order to increase structural rigidity for safety and extend oil seals’ life. This product might be prone to creating some unusual sound after a certain period of usage. How long or how short the unusual shock noise lasts depends on what amount of operation made by each driver. In general, Rally Gravel or Rally Snow inverted suspensions is more prone to having shock noise than ones for drift or street use. Please carry out the following maintenance steps when you find shock noise.
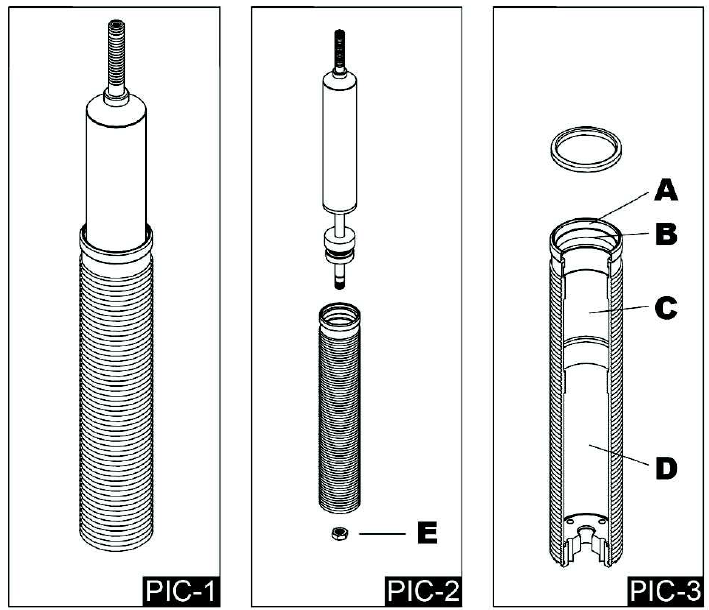
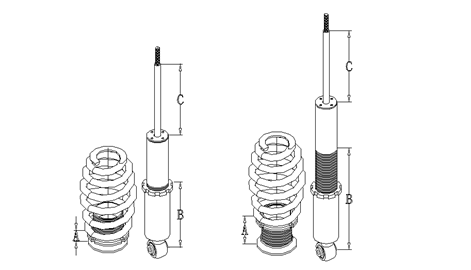
- Remove each component of shock absorbers such as top mounts, springs, locking brackets, lower mounts etc. (pic 1)
- Unscrew the nut on the bottom of the shock with a pneumatic tool, and then remove the shock out of the shock body. (pic 2)
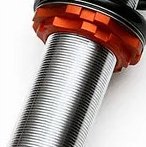
- Remove the oil seal out of inner shock body (A) and clean it with a clean rag. Use stain-removing oil or volatile liquor to clean lubricating oil or depositions present on part A, B, C and D. Grease part B and C with a stick that is covered with lubricating oil (pic 3). Afterwards, grease the oil seal and put it back on the part A. Note: Do not use gasoline to clean each component mentioned above
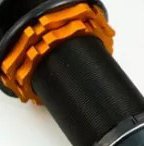
- Clean the shock with a clean rag. Note) Do not use stain-removing oil or volatile liquor to clean the whole shock to prevent from damaging the oil seal because there is oil seal built-in the shock.
- Insert the shock into the shock body and then remove it out of the shock body to examine if the lubricating oil on the shock is smeared evenly.
- Once all maintenances are completed, install all components in reverse step. Use a pneumatic tool to screw the nut (E) back to the shock with anti-loose glue to fix it.
Never adjust ride height using the spring perch. Our systems are designed to adjust ride height via the lower mount. We recommend you remove the coilover system from the vehicle to adjust ride height, as it is necessary to use force when tightening the locking collar on the lower mount.
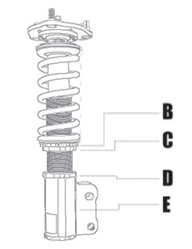
Make sure the spring perch (B) and locking collar (C) are locked by using the spanner wrenches and turning them in opposite directions so they lock against each other. Next, loosen the lower locking collar (D) and spin it up the amount you want to lower the car (for example, if you want to lower your car 2” then spin the collar up 2”). Now use the spanner wrench on the spring perch (B) and begin turning the perch clockwise. This will thread the entire shock assembly further down into the lower mount (E). Once you adjustments are completed, tighten the lower locking collar (D) in place against the lower mount. If you need to raise your car, follow the same steps except turn the shock assembly counterclockwise.
For vehicles without an adjustable lower mount, use the spring perch to adjust ride height. By lowering the locking collar (C ) and spring perch (B) the suspension is allowed to compress. This will result in a lower ride height. After your adjustments are made, tighten the spring perch and locking collar together using the spanner wrenches. Most vehicles without and adjustable lower mount will make use of Helper Springs. See diagram below.

For vehicles with a separate spring and shock, part (A) is used to adjust ride height. After desired ride height is reached with the spring, it is extremely important to adjust the length of the shock by adjusting (B) to your desired position. The last step is to install the wheels and put the car on the ground and move the vehicle 20-30 feet to allow the suspension to settle. Then adjust (B) to let (C) compress 1/3 of the way into the strut and leave 2/3 of the shock shaft outside the strut; then tighten the locking collar against the lower mount. Use of a ziptie or black marker may be useful in judging how to make sure 1/3 of the shock is in the strut. Failure to set the shock stroke correctly will result in damage to the shock and void the warranty. For safety reasons, at least 30mm of the lower mount should be threaded onto the shock.
For additional details, please download our full installation guide.
- Insert the damping adjustment knobs into the top of each shock absorber in the coilover system. For vehicles with the inverted front strut suspension, insert the adjustment knob from the bottom.
- Turn the damping adjustment knob fully clockwise – this is the hardest setting (Maximum Rebound).
- Turn the damping adjustment knob 18 clicks counterclockwise. This is the mid-range setting and is the best starting point for adjusting your dampers. This is called the “baseline” or “standard” setting.
- Drive at Standard, or Baseline setting and adjust in either direction as necessary to achieve desired performance.
- DO NOT FORCE TURNING PAST THE LAST SETTING – DOING SO WILL DAMAGE THE SHOCK ABSORBER.
- The damping adjustment knob may be removed if clearance is needed in hood or trunk area.
- If vehicle is driven without the adjustment knobs in place, cover the adjustment hole to prevent foreign materials from dropping in.
- Some vehicle interior parts may need to be removed to gain access for adjustment.
When ordering replacement parts for your Ksport coilovers there is some specific information you may be asked to make sure we get you the correct parts you need. The information below can help you have that information ready before you contact us.
For vehicles that use MacPherson type suspension there was a production change in the beginning of 2009, therefore the information below can help you determine what size shock body you have. This mainly only applies to front shocks (very few rear shocks). If you’re unsure if your vehicle has MacPherson type suspension then please contact us and we can help you.
If your shock body is Chrome and it is a Kontrol Pro system, your shock diameter is 50mm.
Image A.
If your McPherson type shock body is Black and was purchased new prior to 2009, it can be either 50mm or 52mm depending on its production date. If your coilovers were purchased new in mid 2009 or later, then your MacPherson type shock is more than likely 52mm.
Image B.
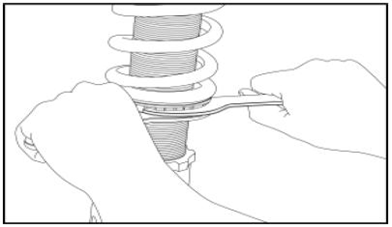
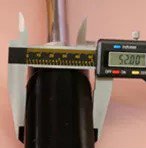
To determine what size the shock body is, you will need to measure it with a digital caliper as shown below.
Image C.
If you’re unsure or have any questions, please contact us by phone (480-829-8100) or our chat system and we can help you properly identify your coilover.
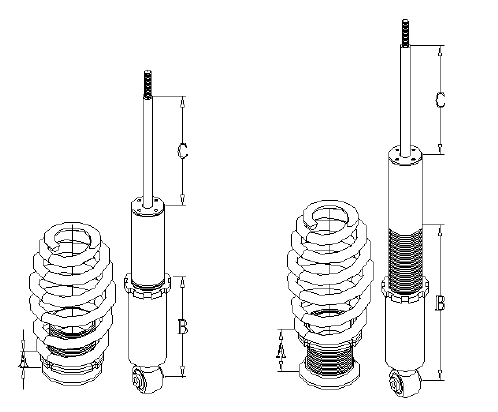
On certain vehicles the spring and shock is separate. To properly set the ride height and shock stroke, please follow these instructions:
- (A) Is used to adjust ride height.
- After desired ride height is reached with the spring, it is essential to adjust the length of shock by adjusting (B) to your desired position.
- After desired ride height is reached, install the wheels, put the car on the ground and move the vehicle 20-30 feet to allow the suspension to settle. Then adjust (B) to let (C) compress 1/3 of the way into the strut and leave 2/3 of the shock shaft outside the strut; tighten the spring perch lock of (B). It is extremely important that (C) is 1/3 compressed when the vehicle is on the ground.
- Failure to set the shock stroke correctly can result in damage to the shock and void the warranty.
- At least 30mm of the lower mount should be threaded onto the shock to be safe.
Vehicles equipped with MacPherson strut type suspensions have two (2) methods of camber adjustment. One or both methods may be used on a single vehicle, but it is recommended that the settings are symmetrical across the vehicle, or the SAME on each side of the vehicle.
Example: If the top camber plate is use on the LEFT side, use the top camber plate on the RIGHT side as well.

- The upper mount (Item A) is used for small camber adjustments, such as dialing in different settings for varying track conditions.
- Set baseline camber by using the elongated hole (Item B) in the lower mount (Item C).
- The camber adjustment tracks should run parallel to the vehicle’s windshield, so that when the bolts in the pillowball camber plate are loosened, the shock shaft travels parallel to the windshield (Diagram E).

If the pillowball is at an extreme angle, you may experience noise from the pillowball. This should be avoided, as it is a sign that you are stressing the pillowball. If your pillowball is at an excessive angle, please reset camber by using the elongated hole in the lower mount. Ksport coilover systems for vehicles with double-wishbone type suspensions do not have adjustment for camber settings. Please contact us for options regarding camber adjustment on double-wishbone equipped vehicles.
NOTE: Please torque the nuts for the top mount studs to 177~221 lbs/inch.
Blown or damaged shocks? Instead of going out and buying a whole new coilover or sending it off to get rebuilt, did you know you could replace the shock yourself? Replacement shocks are available online here and the process is simple. Be sure to check out the video tutorial covering this topic as well.
- Please be sure not to reuse stock nut on top of shaft, as it has locking threads.
- Transfer over any mounts, locks, springs, and other parts from the defective unit to the new shock supplied.
- Remove the top nut from the damaged shock unit to remove any top mounts from the old unit and transfer them over as well.
- Do not allow the shaft to spin which tightening new nut onto shaft, damage in the shock may occur.
- Do not hold the shock shaft with any type of pliers or equipment that may damage the shock shaft. Any scratches or damage to the shaft will result in oil leakage and will void the shock warranty.
- Do not tighten nut more than 45lbs. of torque, otherwise damage or binding may occur.
NOTE: If you do not feel comfortable replacing the shock consult a professional or return the unit to us for replacement.
Autoline Industries/Ksport USA will not be responsible for any damage to the shock due to shaft spin or improper installation.